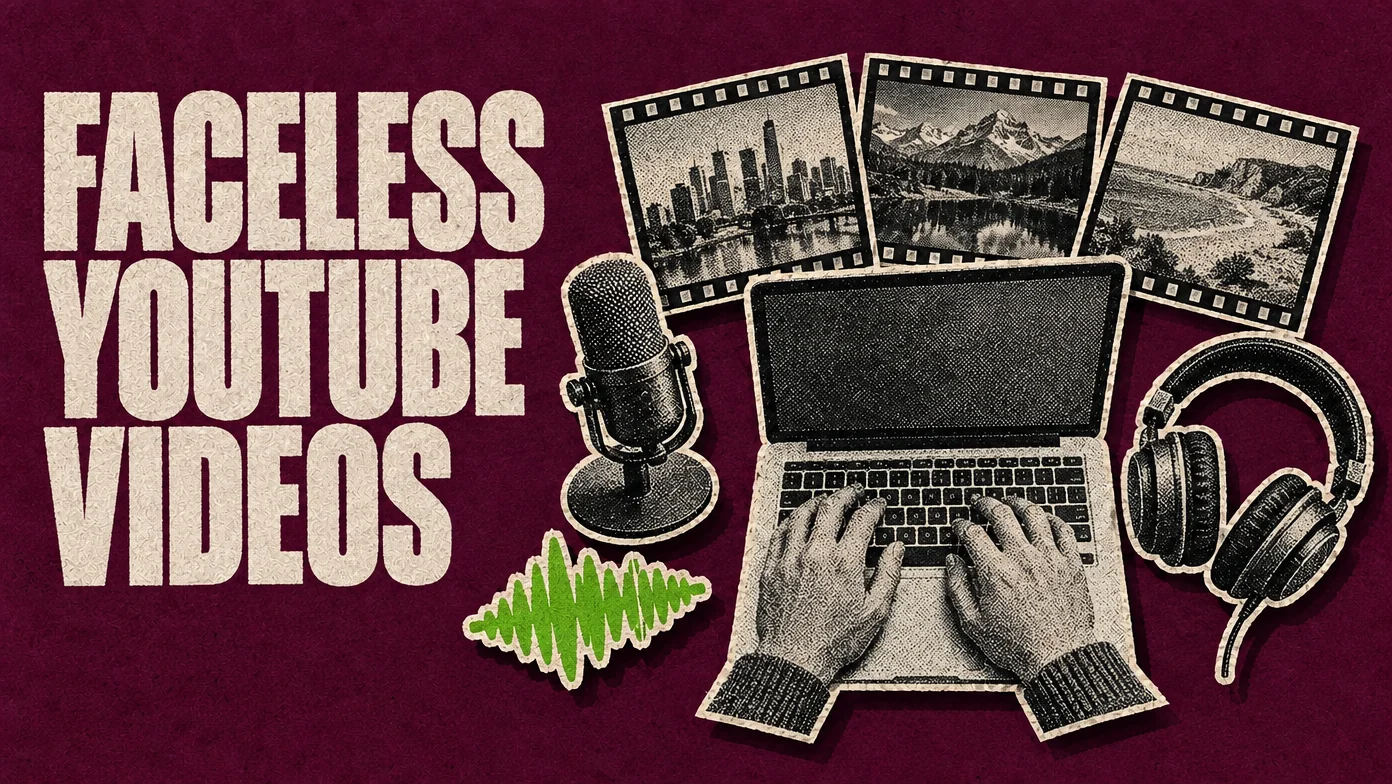
To make a faceless YouTube video, choose a format where the picture can carry the explanation, and write the script and shot list before you touch any footage. Then record or generate the narration and match every line to a visual you filmed, licensed or generated. Edit with the narration first, proofread the captions, and run three checks before you upload: whether YouTube needs an AI label, whether the video adds enough of your own work to earn money, and whether you hold the rights to every asset. You need a computer, a microphone or a voice you’re allowed to use, and a topic you know well. Faceless doesn’t have to mean AI, and it never means silent.
This guide follows one example, a 90-second explainer on how pulleys make lifting easier, through six steps. Each step shows how to do it in ChatCut and what to check in any editor. YouTube’s rules were checked against YouTube Help on November 4, 2026. It doesn’t compare software (our guide to what YouTubers edit with has a faceless section) or cover every editing pass (see how to edit a YouTube video). Nothing here is a promise of views or income: YouTube decides monetization channel by channel.
How to make a faceless YouTube video
- Choose a format you can repeat. Pick one where the visuals explain the topic and your own work is easy to see.
- Write the script and shot list. Every line of narration gets a picture, and every picture gets a source.
- Record or generate the narration. Your own voice, an AI voice, or a clone of your own voice.
- Match a visual to every line. Your footage and screen recordings first, then licensed stock and generated illustration where they fit.
- Edit narration first. Cut the voice track, lay pictures to it, then add music and captions.
- Check, then upload privately. AI label, originality and rights, then watch the private upload before you publish.
Choose a format you can repeat
A faceless video still needs something on screen, and the format decides what. Choose with two questions. Can the picture explain this topic better than a face would? And will a viewer, or a YouTube reviewer, see your own work in it? YouTube’s monetization review looks at a channel as a whole, including its main theme, most viewed and newest videos, so the format you pick now sets the pattern for everything after it.
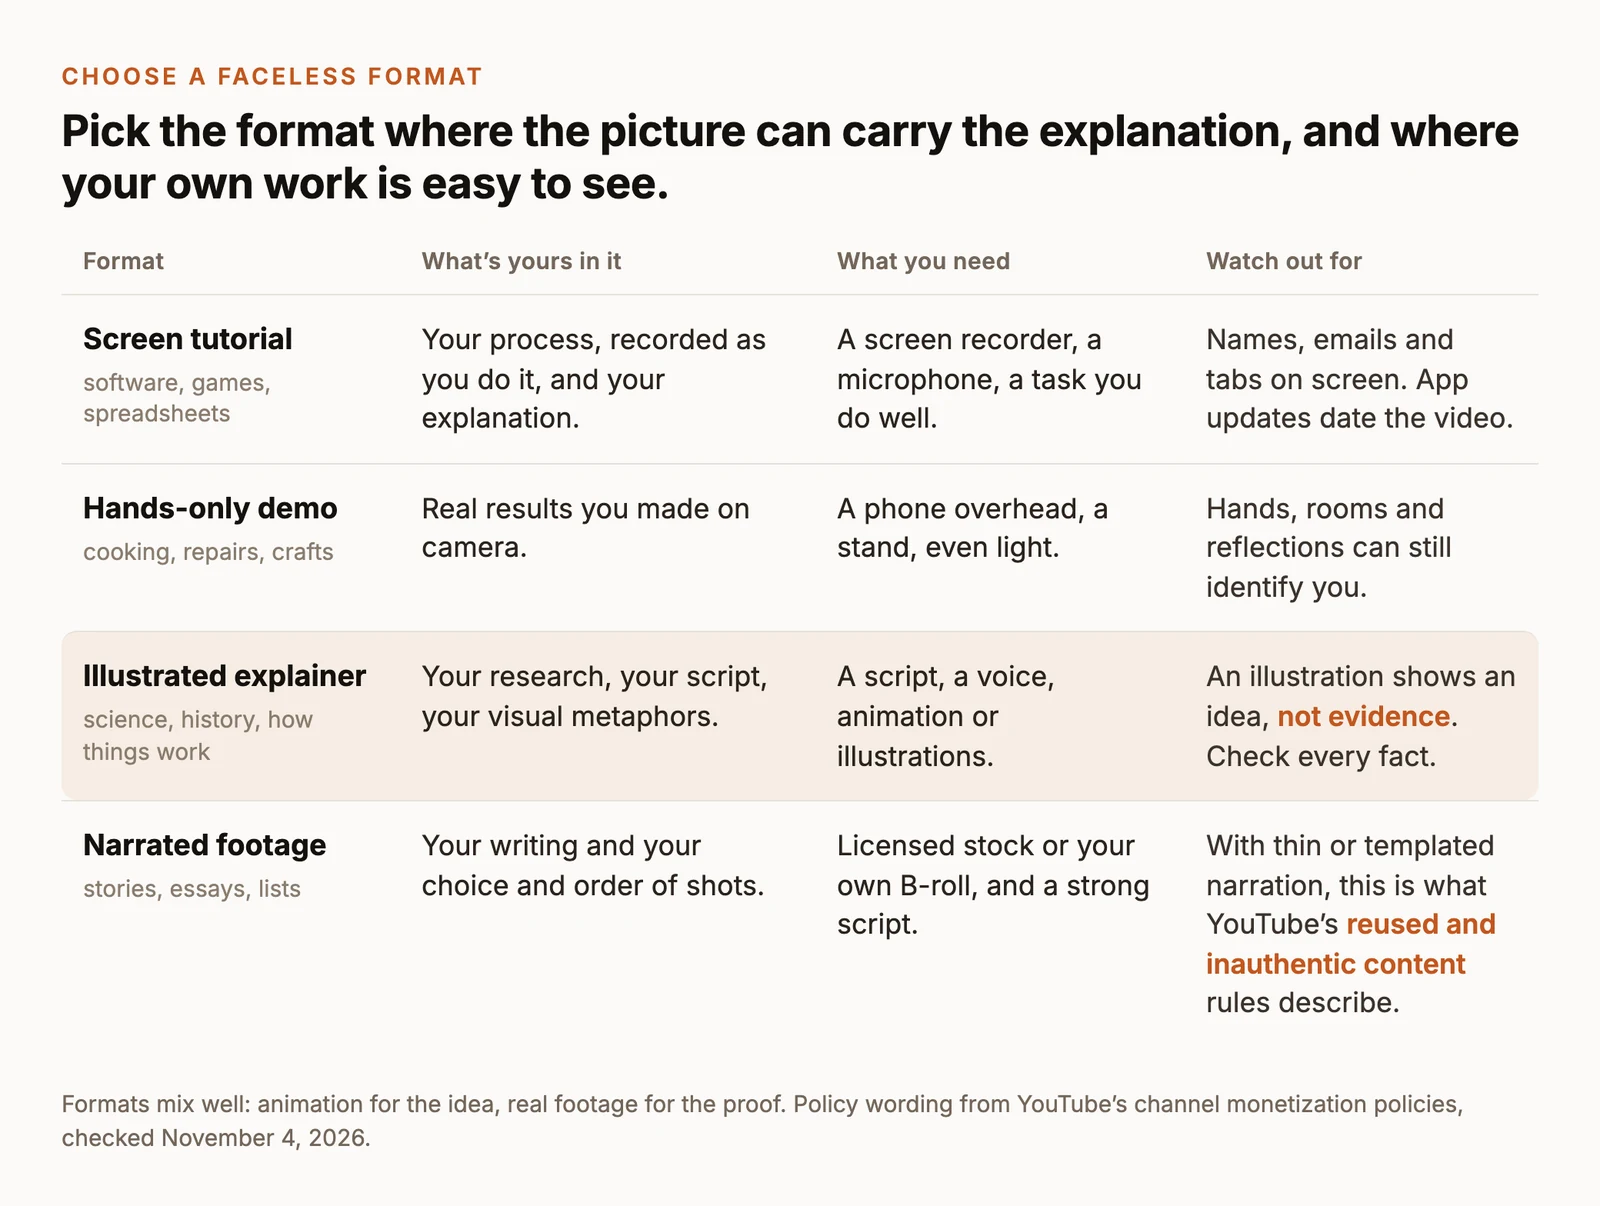
Screen tutorials
If the topic happens on a screen (software, spreadsheets, design tools, games), record the screen and explain as you go. The picture is the evidence: the viewer sees the click and the result. For short tasks, narrate live while you record. For long processes such as installs or renders, record first and narrate afterwards, so you can cut the waiting without cutting your sentences. Before you press record, close notifications and use a clean browser profile, because inboxes, bookmarks and open tabs are the usual leaks.
Hands-only demonstrations
Cooking, repairs, crafts and setups work with a phone mounted above the work and only your hands in frame. Real results are hard to fake, which is what makes this format convincing. Faceless isn’t the same as anonymous, though: hands, rooms, reflections in a window and your voice can all identify you, so check the footage before you post it.
Illustrated explainers
Science, history and how things work are often impossible to film. Illustration and animation can show the inside of a mechanism, a past event or an abstract idea. Keep one distinction clear while you plan: an illustration shows the idea, while real footage or a demonstration proves it. The pulley example uses both.
Narrated footage stories
Stock or your own B-roll under a strong script suits essays, stories and lists. It’s the fastest format to assemble and the one most exposed to YouTube’s rules. The inauthentic content policy names “image slideshows, templated storylines, or scrolling text with minimal or no narrative” as not eligible to earn money. The writing has to do the work here.
Before you commit, write ten specific video ideas for the format, one line each. If you run out at five, the topic is too thin. If the ten only differ by a swapped noun, the format is a template, which is the pattern YouTube’s policy describes. For more starting points, see our list of YouTube video ideas for AI creators.
Write the script and shot list first
Write the narration before you choose any visuals. The narration sets the timing and the order; pictures picked afterwards fit it, while narration written to match a pile of clips tends to become filler. A short explainer needs four parts: a hook that says what the viewer will understand, the explanation in steps, a demonstration that proves the key point, and a takeaway.
Write for the ear. Use short sentences with one idea each, say numbers the way you’d speak them, and read the draft aloud. Then read it again with a timer: that’s your running time. There’s no ideal length to aim for; let the explanation set it.
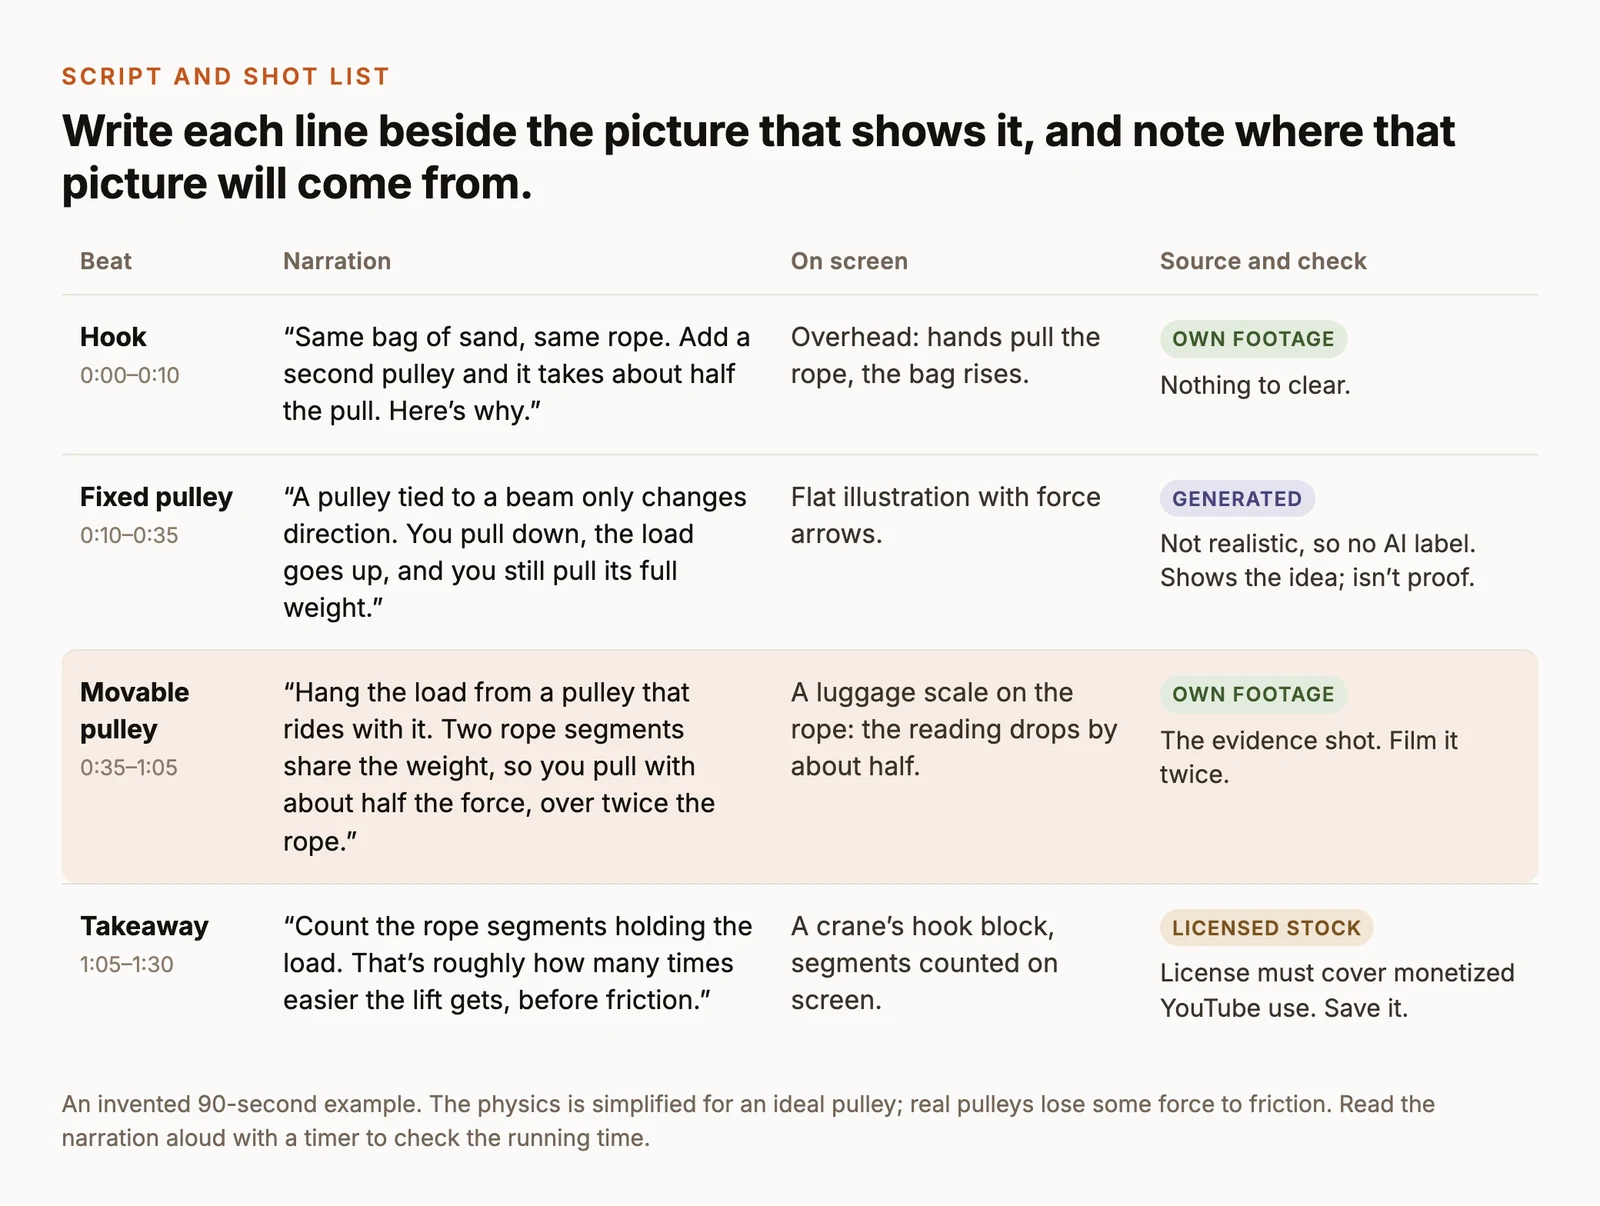
The source column is the part most faceless scripts skip. Deciding it now tells you what to film this week, what to license and what to generate. It also gives you the record you’ll need for the checks before upload.
AI can draft the first version. YouTube lists using generative AI to create or improve a script or outline among uses that don’t need an AI label, but the facts are still yours to check. In ChatCut, paste a request like this into the AI composer (Agent requests use credits):
Check every factual line against a source you’d be happy to cite in the description. Generated scripts sound equally confident when they’re wrong, and viewers of explainers notice.
Record or generate the narration
In a faceless video the narration carries the whole thing, so it deserves more care than any single visual. There are three routes.
Record your own voice
A microphone close to your mouth matters more than an expensive one far away. Record in a quiet room with soft surfaces, turn off fans and notifications, and do a 15-second test with headphones before the real take. Read one paragraph at a time; when you stumble, pause and restart the whole sentence, which leaves a clean place to cut.
In ChatCut: open the chevron on the Record control in the Timeline playback controls, choose Voiceover, pick the microphone and whether you want the countdown, then record. The take is saved to My Assets and placed on an audio track at the playhead, and recording doesn’t use credits. Afterwards, open Transcript and delete the false starts as text; deleting words cuts that stretch of audio.
Use an AI voice
An AI voice suits you if recording is what you keep putting off, or if you need narration in a language you don’t speak. In ChatCut, select + → Voices below the AI composer, preview voices under Featured or Browse all voices, and click Use to attach one. Selecting a voice doesn’t generate anything yet; you send it with the script:
AI narration uses credits. Before you commit to a voice, listen to a full minute of it, not a single sentence: flat delivery is easier to hear over a whole video. Check names, numbers and technical terms, and regenerate only the sentence that’s wrong rather than the whole script. Once a voice works, keep it for every video so the channel has a consistent sound. Our guide to AI voice generators explains the different kinds of voice tools.
Clone a voice only with consent
Cloning your own voice lets you fix a line or add a new one without setting up the microphone again. YouTube lists cloning one’s own voice for voiceovers or dubs among uses that don’t need an AI label. In ChatCut, select + → Voices → Clone Voice, confirm the voice-rights notice, then read the displayed text or upload 10 seconds to 3 minutes of clean speech (at least 30 seconds is recommended). Any signed-in account can create a clone of its own voice; generating narration with it needs a paid plan (voice cloning docs).
Someone else’s voice is different. Clone it only with that person’s explicit permission for this use, ideally in writing. A cloned voice that makes a real person seem to say something they didn’t requires YouTube’s AI label, and without permission it’s impersonation. Don’t build a channel around an AI “expert” either: YouTube won’t monetize channels that use AI personas presenting as human experts on health, legal, financial or political topics.
Match a visual to every line
Go through the script line by line. Change the picture when the idea changes, and start each new shot on the word it illustrates. When you have a choice, footage that proves a point beats an illustration that explains it, and both beat stock that only sets a mood.
Use your own footage and screen recordings first
Your own material is the strongest evidence and the clearest sign of original work. In the pulley example, the luggage-scale shot is the one that makes the explanation believable, so film it twice. Hold every shot for at least five seconds so you have room to trim.
In ChatCut: choose Screen in the Record menu to capture a window or display through your system’s picker. For phone footage, use My Assets → Upload → Files…, or From phone… to send clips straight from the phone through a QR code.
License stock for context you can’t film
Stock is useful for things you can’t reasonably film yourself, such as the crane in the takeaway beat. Before you use a clip, check that its license covers monetized YouTube videos and whether it requires a credit, then save the license page or receipt in the project folder under the clip’s name. For music, tracks from the YouTube Audio Library are cleared for YouTube; some ask for a credit line in the description. A stock license settles copyright; it does nothing for originality, which is the next section’s problem.
Generate illustrations for what can’t be filmed
Generated illustration and animation are the right tool for the inside of a mechanism, a historical scene or an abstract idea. Keep them clearly illustrative when they stand in for reality. A flat, non-photographic style doesn’t need YouTube’s AI label, while a realistic generated scene of a real place or event does, and it should never be presented as footage.
In ChatCut: generating individual clips in Video Gen needs a paid plan and uses credits. For a whole narrated animation, the explainer Skills turn a script into illustrated scenes with narration: open the book icon below the composer, choose Skills → Browse all skills, pick a style such as Pastel Flat 2D or Whiteboard Doodle, and attach your checked script. Generation inside a Skill uses credits, like any other generation.
If you’d rather plan before generating anything, ask for the visual plan first and generate only what you approve:
Edit the narration first, then the picture
Build the edit in the same order as the script: sound first, picture second, polish last. Every change to the narration shifts everything after it, so pictures placed too early have to be placed again.
- Lock the narration. Put it on A1, cut retakes and long pauses, and listen once from start to finish. In ChatCut’s Transcript, select the words to remove and press Delete.
- Lay the pictures to the words. Put each visual on the video track so it starts on the word it illustrates. A shot that arrives a sentence late reads as a mistake.
- Add text only where it helps. A number, a term or the name of a step. If a line of text repeats the narration word for word, cut it.
- Put music under the voice. Give music its own track, then use Track controls → Audio ducking with the narration as the anchor and music as the follower, so it dips whenever the voice plays.
- Caption and proofread. Turn on Captions below the Viewer, pick a style from its chevron, and correct names and numbers in the caption track’s Content panel. Speech recognition gets those wrong most often.
- Export. Use Export → Video, then Export → Subtitles → SubRip (.srt) for a caption file you can upload to YouTube.
ChatCut Desktop runs on macOS 13 or later (Apple silicon or Intel) and Windows 10 or later, and renders exports on your computer at up to 4K. Exports rendered in the cloud from the web app go up to 1080p, and on the free plan they share a 60-minute total. For YouTube’s recommended codec, frame rate and bitrate, see the export step of how to edit a YouTube video.
Check AI labels, originality and rights
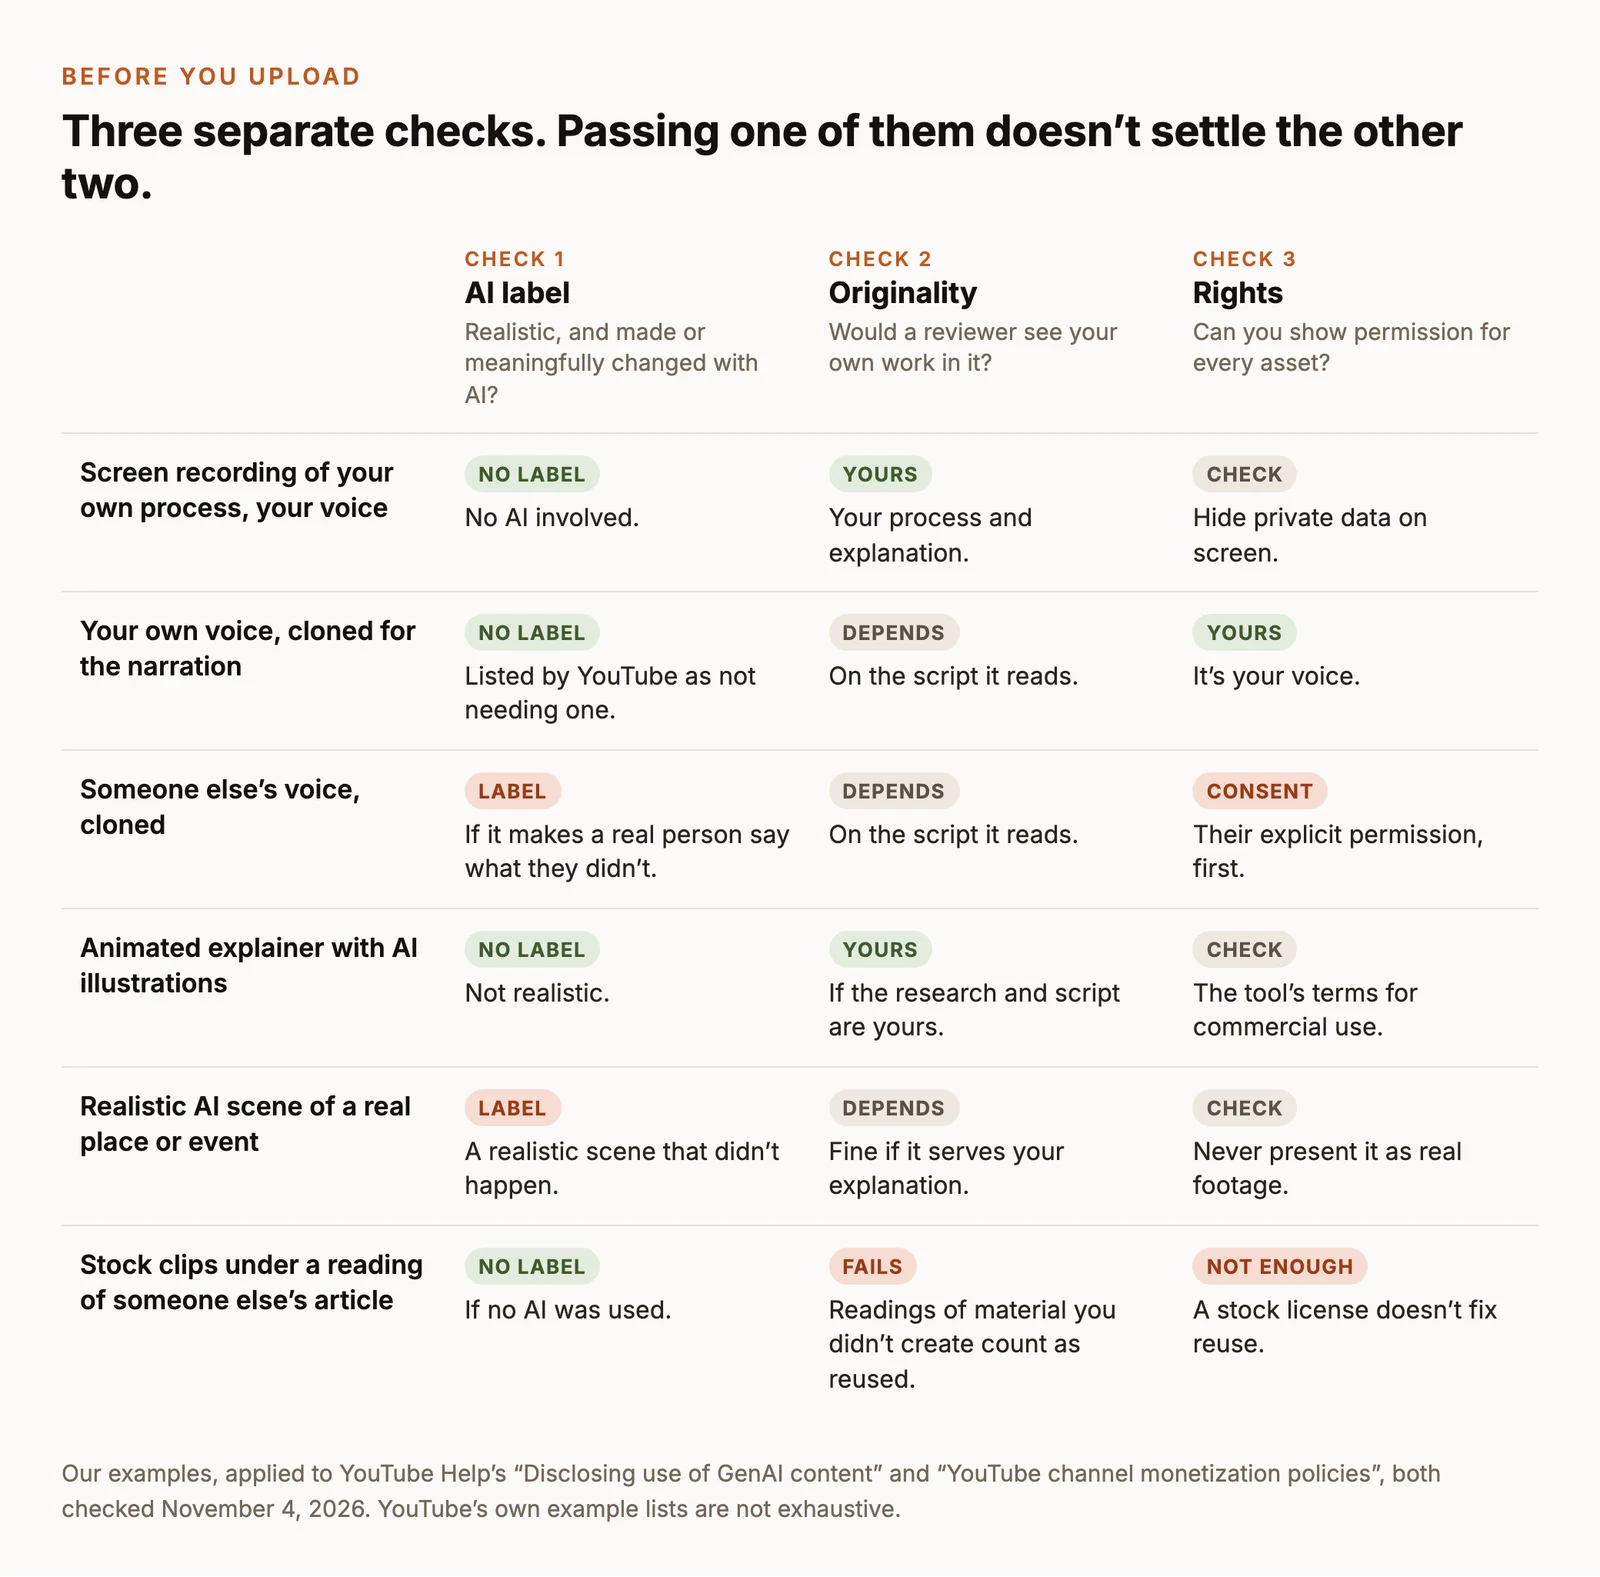
Three different questions decide whether a faceless video is safe to publish and able to earn money. They’re easy to confuse, and passing one doesn’t answer the others: a disclosure doesn’t make reused content original, and a stock license doesn’t make it eligible either.
Does YouTube need an AI label?
YouTube requires a disclosure when content is realistic and AI-generated or meaningfully altered. Its list includes making a real person appear to say or do something they didn’t, altering footage of a real event or place, generating a realistic scene that didn’t happen, and AI-generated music. You don’t need to disclose clearly unrealistic content such as animation, minor edits like color correction, production help with scripts, titles or thumbnails, captions, or cloning your own voice for voiceovers.
YouTube’s lists don’t mention a synthetic narrator reading your own script. Disclosing is the cautious choice when a voice could pass for a real, identifiable person, and YouTube says a disclosure alone won’t limit a video’s audience or its eligibility to earn money. To disclose, choose Yes under AI use in the Attributes section while uploading in YouTube Studio. YouTube can also apply a label automatically, for example to files carrying C2PA metadata, and creators who consistently don’t disclose may face penalties, including removal of content or suspension from the YouTube Partner Program.
Is it original enough to monetize?
Two parts of YouTube’s channel monetization policies matter most for faceless channels:
- Reused content. Material taken from YouTube or elsewhere without significant original commentary, substantial changes, or educational or entertainment value. This applies even when you have the original creator’s permission, and it includes videos that only read out text you didn’t write, such as articles or news feeds.
- Inauthentic content. Mass-produced or repetitive videos that look made from a template. YouTube renamed this policy from “repetitious content” in July 2025 and lists AI-generated content made with generic templates, without the creator’s own insight, as not eligible. It allows the same intro and outro across videos, and AI used to edit scripts or create background visuals for a well-researched narrative.
Separately, channels that use AI-generated personas presenting as human experts on health, legal, financial or political topics can’t monetize. Reviewers look at the channel as a whole, so one templated series can affect every video. Keep your raw recordings, project files and research notes: they’re the simplest record of how you made the work.
Do you have the rights?
Keep a short rights log for each video: every asset, where it came from, and the license, permission or receipt that covers it. That means stock clips and music licensed for monetized YouTube use, written consent for any voice that isn’t yours, and the terms of whatever tool generated your illustrations. It takes a few minutes per video, and it’s the answer you’ll want to hand if a copyright claim or a monetization review asks how you made the video.
Upload privately and check what it reveals
Upload as Private first and watch the whole video in YouTube, once on a computer and once on a phone with captions on. Look specifically for what faceless videos leak: names and email addresses in screen recordings, notifications, open tabs, addresses on parcels, and faces reflected in windows or dark screens. Then set the AI use answer, upload your SRT file under Subtitles, and add any credit lines your stock or music licenses require to the description. Publish or schedule when it looks right.
The same project can feed a vertical version: our guide to making YouTube Shorts covers the format. Keep the editable project, too. A faceless channel reuses its voice, caption style and structure from video to video, and the next one starts faster from a project you’ve already checked.