A video essay is an argument made with pictures and sound: a claim, the evidence for it and your analysis, arranged so viewers see the proof as they hear the point. To make one, choose a claim you can investigate, research it in an evidence log, write the script in columns of narration and visuals, gather visual evidence you’re allowed to use, record the narration, and edit so each claim lands on its evidence. Then review the argument, sources and captions before you export. You need a question, a microphone and an editor. The research and the argument are the parts no tool does for you.
This guide carries one small worked example, a question about the shipping container, from first question to script, using sources checked on November 4, 2026. It covers analytical essays for YouTube and for class. If a school or employer has asked for a “video essay” about yourself, that’s a recorded personal statement, so follow their brief instead. The production steps are shown in ChatCut and described so you can repeat them in any editor.
How to make a video essay in seven steps
- Choose a claim you can investigate: a question whose answer someone could dispute, narrow enough to prove in the time you have.
- Research it in an evidence log: one entry per claim, with its source, what it shows, its limits and your right to show it.
- Write the script in columns: narration beside what viewers see, each claim tied to a log entry.
- Gather visual evidence: separate evidence from illustration, and check that you may use each piece.
- Record the narration and build a rough cut on it.
- Edit for proof: put each piece of evidence on screen as its claim is spoken, and leave time to read it.
- Review and export: check the argument, numbers, credits and captions in the exported file.
What makes a video essay an argument
A video essay makes a claim and shows the evidence for it. That separates it from the formats it borrows from: a recap retells what happened, an explainer makes a topic easier to understand, and a review ends in a verdict. An essay can use all three, but it is built around a thesis someone could reasonably dispute, and every scene supports, complicates or answers that thesis.
The other half is the medium. The AFTRS library guide to video essays puts it plainly: a video essay is “not simply a written essay readout on film.” Pictures, on-screen text and sound carry part of the argument. Two quick tests catch the common failures:
- Watch it muted. With the sound off, does the picture still show what the narration claims, or is it just something to look at while you talk?
- Listen without watching. With only the sound, can you still follow the argument, or does the narration lean on “as you can see” without saying what?
A scene that fails the first test needs real evidence on screen. A scene that fails the second needs a sentence that names what the viewer is looking at.
Choose a claim you can investigate
Start from a question, not a topic. “Shipping containers” is a topic. “Why did the shipping container catch on?” is a question. “It caught on because it made loading a ship dramatically cheaper” is a working thesis: a claim you could turn out to be wrong about, which is what makes it worth researching. If you’re still looking for a subject, our YouTube video ideas for AI creators covers formats and niches; this guide picks up once you have one.
Check three things before you commit:
- Can you narrow it? A claim that needs a whole history to prove won’t fit in ten minutes. Pick one decision, one scene, one change or one number.
- Can you show it? List the evidence a viewer could see: documents, data you can chart, footage you shot or may use, screenshots, a demonstration. If every point would be narration over generic footage, change the question.
- What’s the strongest competing explanation? Write it down now. A good essay answers the best case against its thesis, not a weak one, and that counterpoint is often its most interesting section.
Treat the thesis as provisional. If the evidence points somewhere else, change the thesis. An essay that follows its evidence is more convincing than one that bends it.
Research it in an evidence log
Keep your research in a log, not a pile of browser tabs. Each entry records one claim and what you need to defend it on screen: the source, where in that source (page, paragraph or timecode), what it actually shows, its limits, your right to use any visual, and where it lands in the script. Mark each entry as checked or unsourced, and keep unsourced claims out of the script until they have a source.
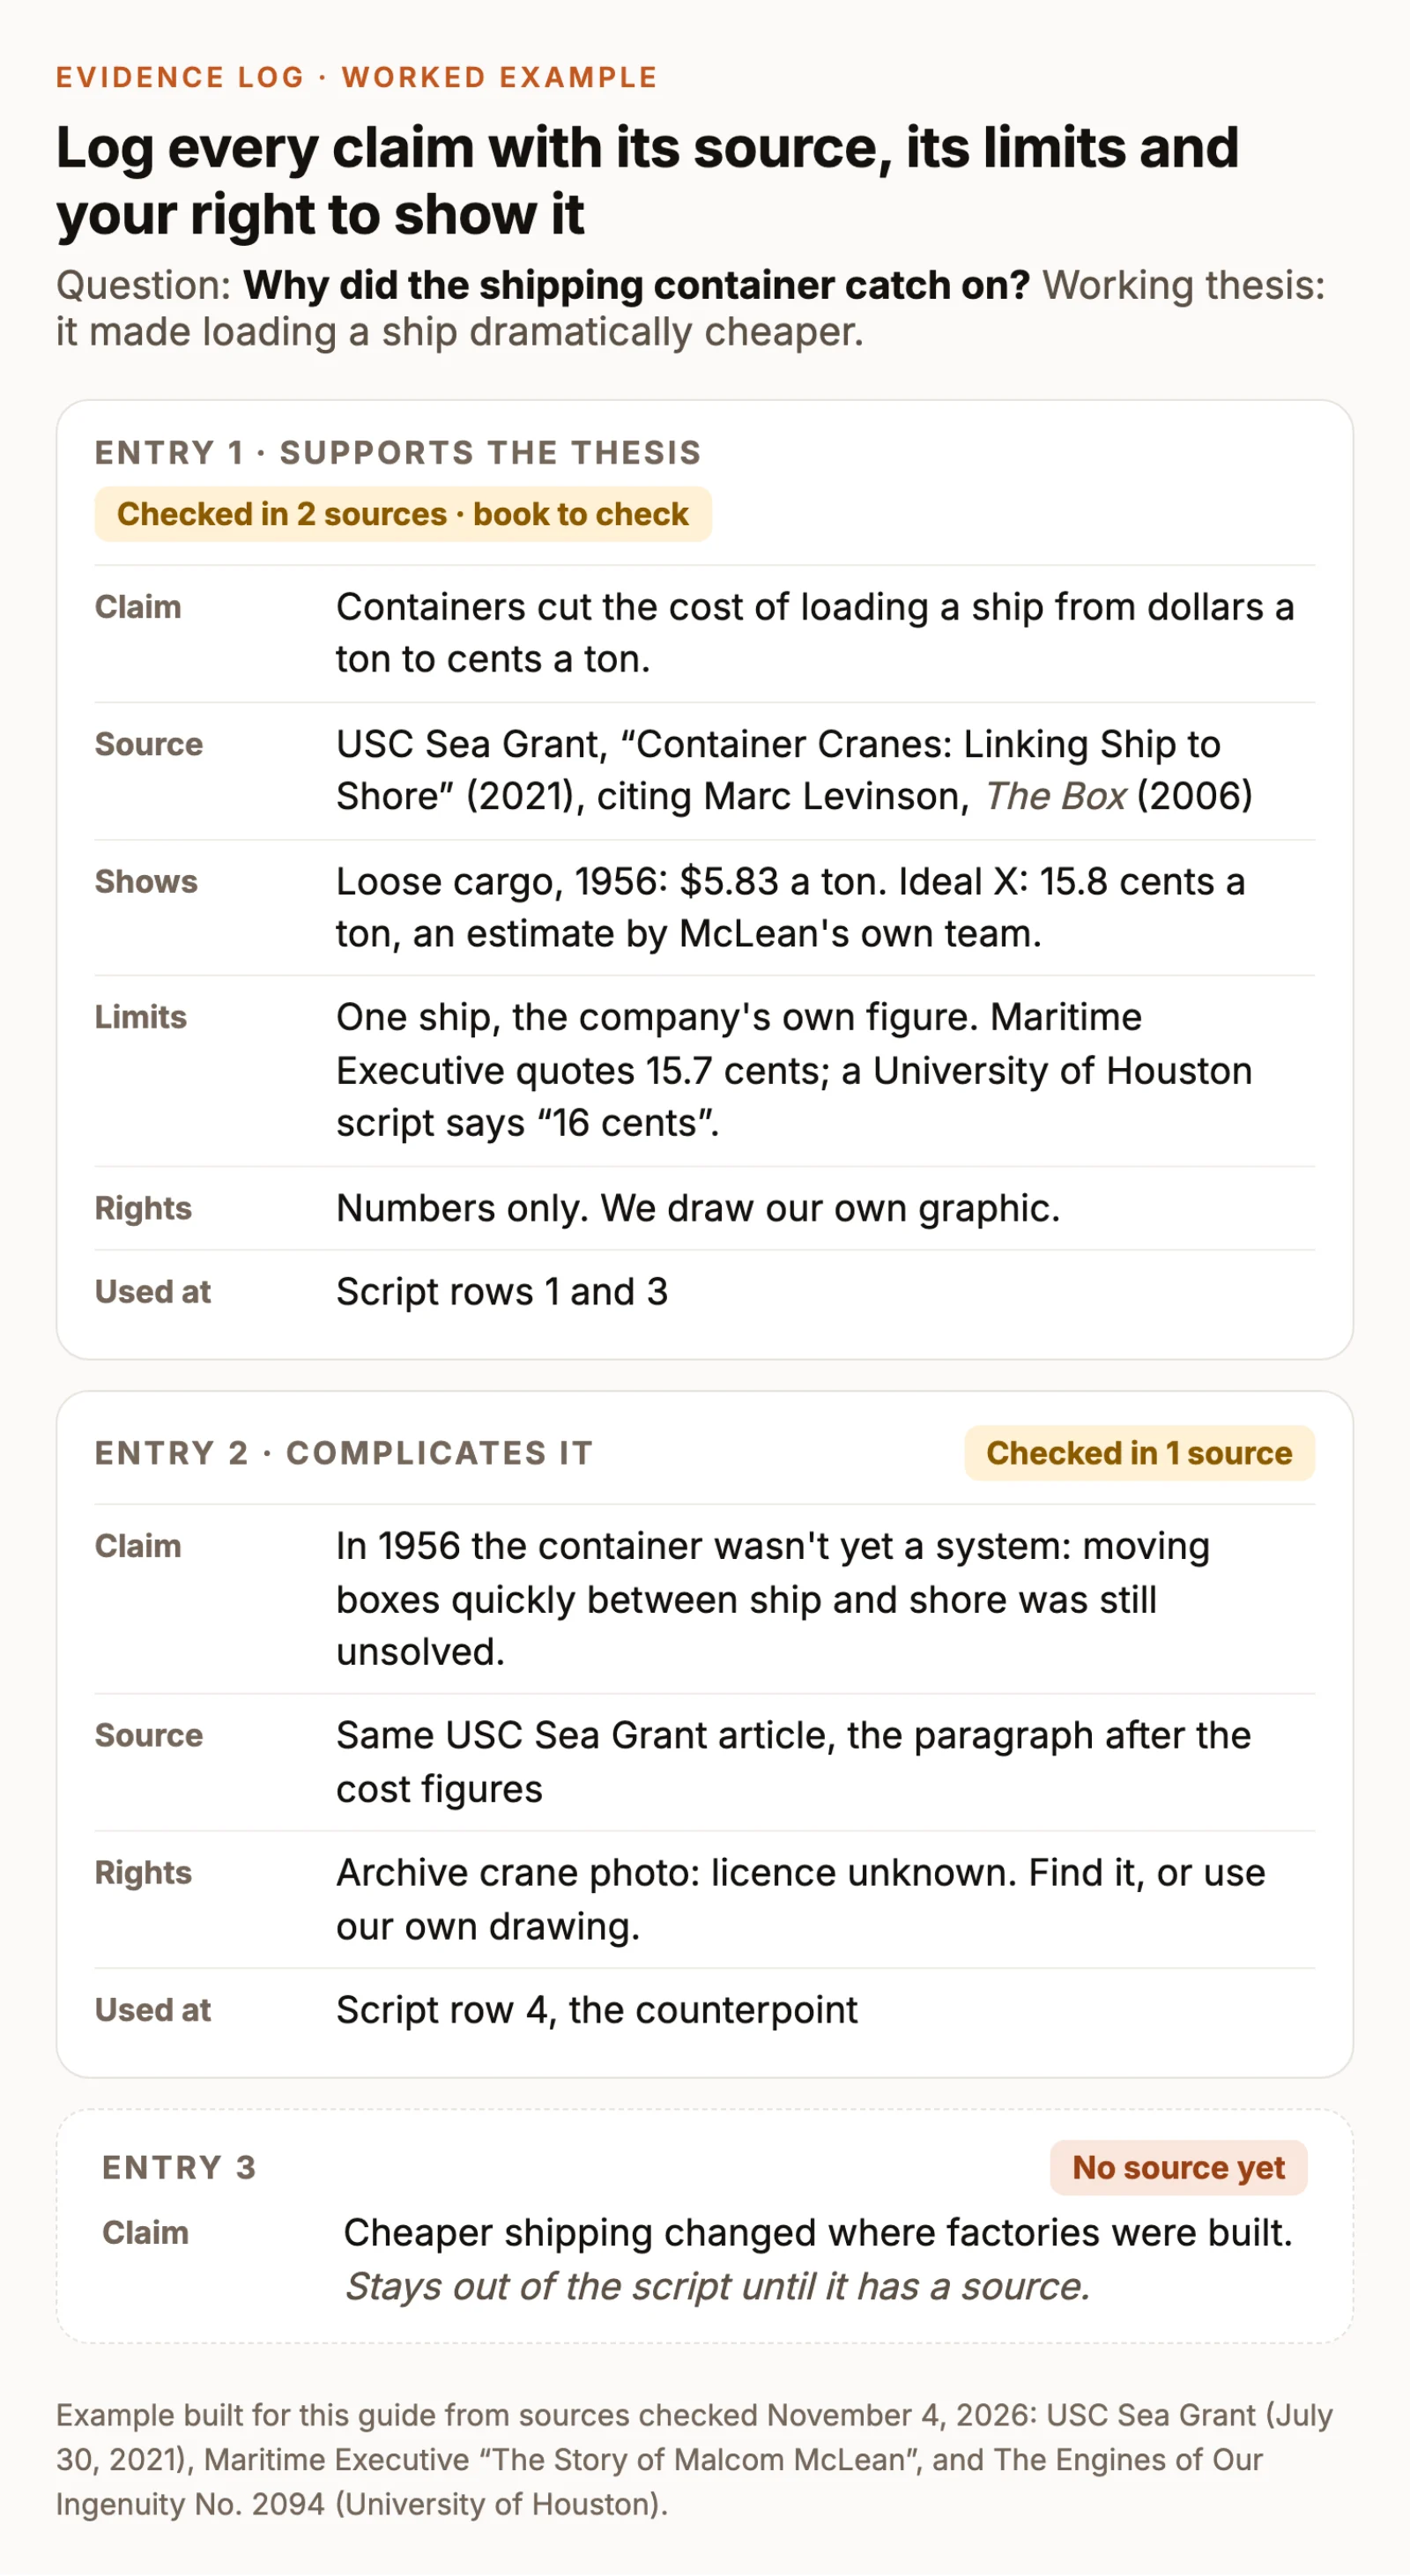
The example shows why the limits field matters. Three secondary sources give the same 1956 comparison three ways. USC Sea Grant, citing Marc Levinson’s book The Box, gives $5.83 a ton for loading loose cargo and 15.8 cents a ton for the first container ship. Maritime Executive gives 15.7 cents, and a University of Houston radio script rounds to six dollars and 16 cents. The container figure was also an estimate by the shipping company’s own experts, for one ship. None of that makes the claim wrong. It tells you what to say (“about 16 cents, by the company’s own estimate”), which source to credit, and what to check in the book before you quote it to the cent.
Prefer primary sources where you can find them: the document, the dataset, the original footage, the paper. A secondary source is fine for context, but note what it cites, so you can trace a number back when sources disagree.
If you use an AI assistant to organize your notes, give it only your sources and forbid it from adding new ones. AI tools can produce citations that look real and aren’t, so check every entry against its source yourself:
Write the script in audio-visual columns
An essay script has the same skeleton as any other video script: a hook, sections and an ending. Our guide to writing a script for a video covers structures, hooks and word counts. What’s specific to an essay is tying every line of sound to its proof, so write the script in columns: the time, what viewers hear, and what they see, with the log entry behind each claim.
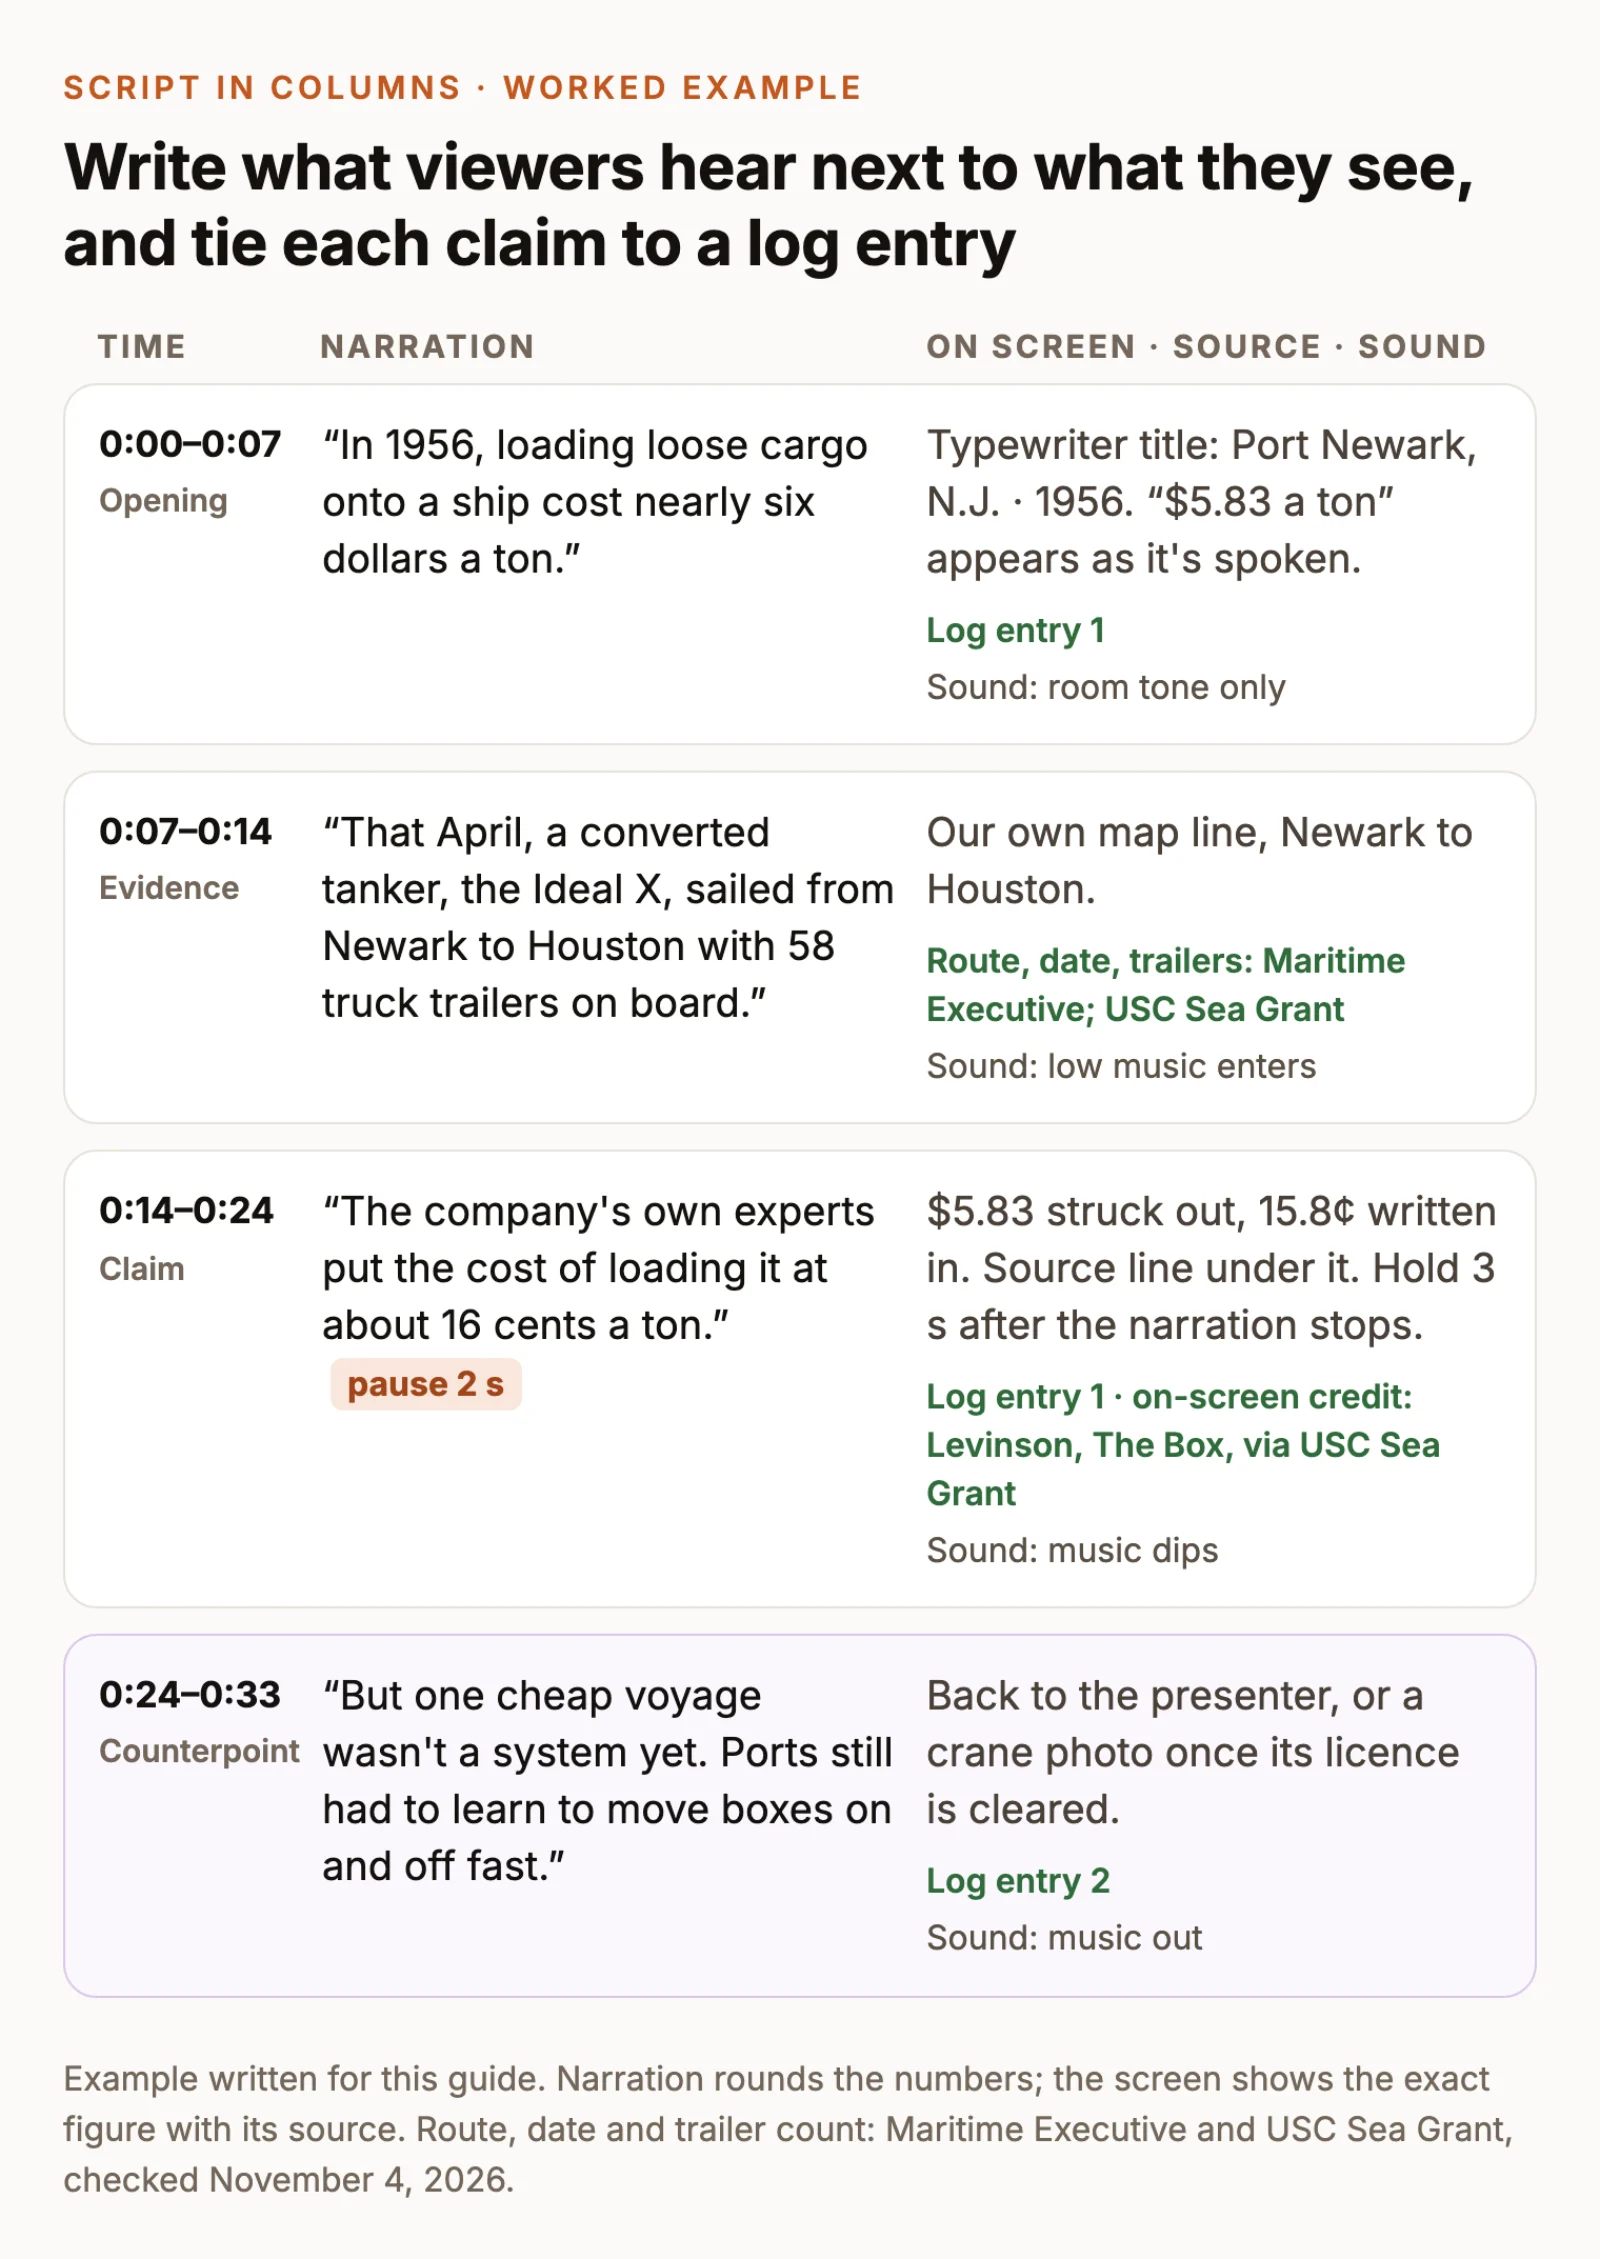
A few habits the columns make easy:
- One claim per row. If a row needs two log entries for two different claims, split it.
- Round in speech, be exact on screen. Viewers read a precise number faster than they hear one, and the source line can sit right under it.
- Write the pauses. After a key piece of evidence, mark a pause so viewers have time to look. As a rule of thumb, hold on-screen text long enough to read it aloud twice.
- Give the counterpoint its own row, with its own evidence, before the conclusion.
- Read the narration aloud before you record. Rewrite every sentence you stumble on, and mark the names and numbers you need to say carefully.
Gather visual evidence and check your right to use it
Separate evidence from illustration
Evidence is the thing your claim is about: the shot you’re analyzing, the document, a chart drawn from the numbers in your log, your own screen recording or demonstration. Illustration sets context or mood: B-roll, maps, animation, a presenter on camera. Both have a place, but only evidence proves anything. A generated or reconstructed image of a historical event is illustration, never an archival record, so label it when viewers could mistake it for one.
Make what you can. A chart you draw from logged numbers, a map you make and footage you shoot yourself avoid most rights questions. Quotes, clips and images from other people’s work don’t, so give each one a rights note in the log.
Treat fair use as a case-by-case question
This isn’t legal advice, but a few points from the official sources shape every decision:
- In the US, fair use is weighed on four factors: the purpose and character of your use, the nature of the original work, how much of it you use, and the effect on its market. The US Copyright Office says courts decide case by case, with no formula that makes a set percentage or amount of a work safe to use without permission. There is no safe number of seconds.
- YouTube’s fair use guide notes that crediting the owner, or writing “no infringement intended,” doesn’t by itself make a use fair, and that a short clip of a popular song can still bring a copyright claim that stops you from monetizing the video. It also suggests getting legal advice before uploading videos that use copyrighted content.
- Rules outside the US differ. Some countries use fair dealing, and the EU allows uses in specific categories such as quotation, criticism and review.
In practice, use only as much of a clip as your point needs, and talk about it while it plays, so the clip serves your analysis rather than replacing the original. Where a factual source and a creative one would make the same point, the factual one weighs better under the second factor. When you’re unsure, ask permission, license the material or replace it with something you made.
Credit sources where they appear on screen, with author, title and year, and list every source in the description or end credits. For a class, follow your course’s citation style. A credit tells viewers where the evidence came from; it isn’t permission.
Record the narration and build a rough cut
Record somewhere quiet with the microphone close to your mouth; our talking head video guide covers microphone and room setup. Record one section at a time, and when you stumble, pause and restart the whole sentence so the edit has a clean place to cut.
In ChatCut, you can record straight into the project: click the arrow beside the recording control above the timeline, choose Voiceover, and confirm the microphone and countdown. To use a recording made elsewhere, import it with My Assets → Upload → Files… and drag it onto the timeline. If you’d rather not narrate yourself, ChatCut can generate narration from your script with a voice from + → Voices; generated narration uses credits, and you should only clone a voice you’re authorized to use. The AI voiceover guide has the steps.
Next, clean up the narration. Open Transcript, select a retake or a false start and press Delete to cut it; ChatCut removes that stretch from the timeline without touching your source file. On a long recording, ask the agent for a first pass instead. Type @ in the chat box and pick your narration clip in place of @narration:
If you narrate on camera, the Speech Cleanup Skill runs the same pass from a form, then continues step by step through B-roll, graphics and captions. Either way, play the result from the first word to the last. Check numbers in particular, because speech recognition can write a spoken number in the wrong form or lose a decimal point. In one of our own demo clips, the screen shows “$5.86” and ChatCut’s transcript reads “586”.
Then build the rough cut on the narration. Lay the clean narration on the main audio track and place each piece of evidence on the video track above, at the words it supports. Where evidence is still missing, drop in a plain title card that says what belongs there, such as “Row 3: cost chart,” so the gaps stay visible.
Edit for proof
Now make each claim land on its evidence. In Transcript, clicking a word moves the playhead to it, so you can place a chart or quote on the exact word that needs it. Bring evidence in on the claim or a beat before, and hold it after the narration stops when viewers need time to read it.
Numbers and quotes work best as text on screen, with the source underneath. If you appear on camera, ChatCut’s packaging Skills add that layer around your explanation. Red-Pen Rewind, made for history, investigations and fact-checks, uses typewriter type, archive paper and a single red pen:
The Skill needs footage of a presenter speaking to camera, and it cleans obvious flubs and long pauses before it adds graphics. For a data-led essay, Editorial Explainer uses notebook chapter pages, grey-paper charts and yellow highlighter marks instead. If your essay is narration only, ask for individual cards as motion graphics, which also use credits:
Swap in your own numbers, source and timing. Then finish the soundtrack and captions:
- Music sits well under the voice and drops out under key lines; silence after a piece of evidence is often stronger than a swell.
- Captions help viewers follow precise wording with the sound off. Turn them on with the Captions control below the Viewer, or use the Add captions Skill to caption the video in a style you pick. Then correct names and numbers against your log in the caption’s Content panel.
Review and export
Watch the whole essay once without stopping, then go through it with your log open:
- Argument. Run the muted and listen-only tests on every section. Does the counterpoint get a fair hearing, and does the ending answer the opening question?
- Evidence. Every number and quote on screen matches its log entry, and every claim has an entry.
- Rights and credits. Every clip and image has a rights note, the on-screen credits are in place, and the full source list is ready for the description.
- Speech and sync. Deleting words in Transcript cuts only the selected track, so check that evidence on other tracks still lines up with its words, and listen across every cut.
- Captions. Names, numbers and quotes are spelled exactly as in your sources.
Then export. In ChatCut Desktop, choose Export → Video, pick a resolution up to 4K, the frame rate and the range, and keep the app open while it renders on your computer; Desktop local export lists every setting. Cloud-rendered exports go up to 1080p, and on the Free plan, web and cloud exports share a cumulative 60-minute allowance that Desktop’s local exports don’t count toward. For YouTube, also export Export → Subtitles → SubRip (.srt) and upload the file with the video. Watch the exported file, not the timeline, before you publish.