A product demo video shows your real product completing one real task, so viewers can see that it works before they try it. To make one, pick a single use case and viewer, and write a script in which every line has something on screen to prove it. Record the real product with believable test data, edit the pacing, add zooms and callouts only where a detail needs them, and end on one next step. You need the product with a demo account, a microphone and a screen recorder. The steps apply to web and desktop software; a physical product needs a camera shoot instead.
This guide carries one invented example through every step: a weekly status report in a project-tracking app. The recording and editing steps are shown in ChatCut, and each one is described so you can repeat it in another tool. If you’re still choosing a recorder, our comparison of screen recording software covers that question.
How to make a product demo video
- Pick one use case and one viewer. Where the video will live decides what it has to do.
- Write a script the screen can prove. Each line of narration paired with the action that shows it.
- Record the real product. A demo account, believable data, a clean screen and short takes.
- Edit the pacing, zooms and callouts. Remove idle time, keep cause and effect, point only where it helps.
- End on one next step. Then export, watch the file at real size and assign someone to keep it current.
Product demo, explainer or promo?
The three get mixed up because they often use the same screenshots, but they do different jobs. A demo proves the product does something. An explainer explains a problem or an idea, often with animation. A promo makes people want to look, in a few seconds, with music and bold type.
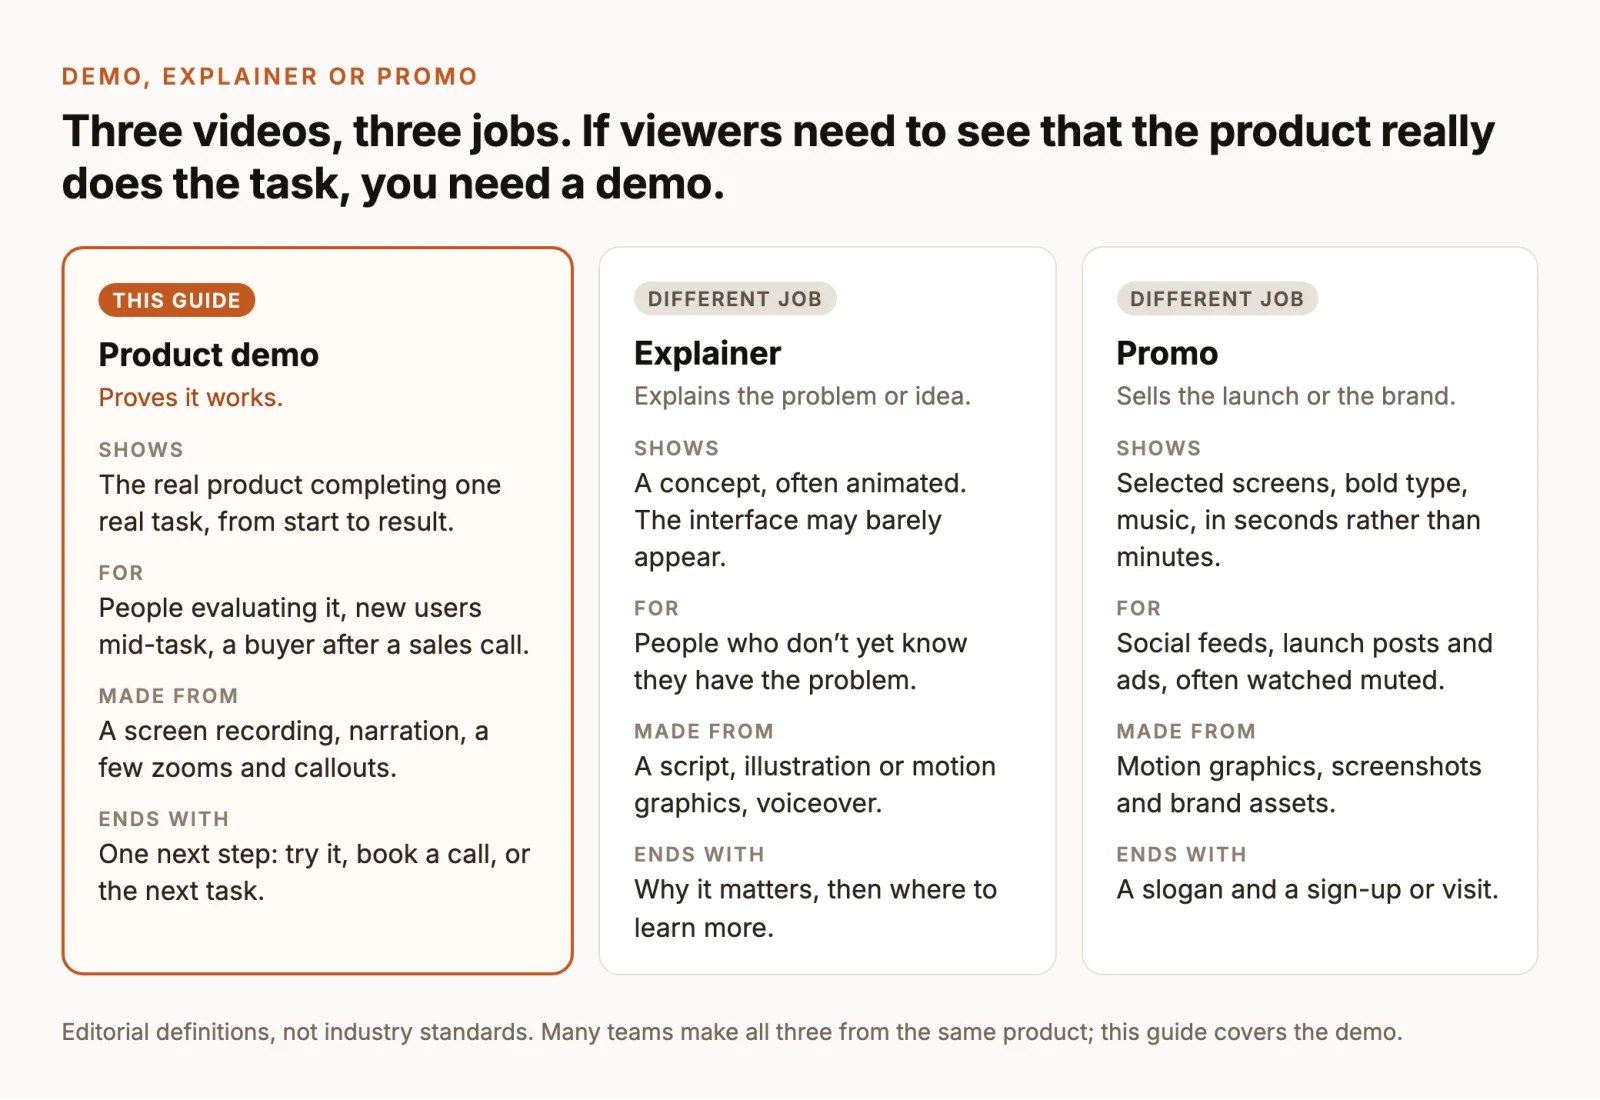
This guide covers the demo. For concept-led videos, see how to make an explainer video; for tools that build promos from templates, see our comparison of promo video makers. The last section below shows how to make a short promo from the same product once the demo is done.
Pick one use case and one viewer
The same feature needs different demos in different places, because the viewer arrives with a different question each time:
- Landing or product page. A curious visitor who didn’t ask for a lesson. Get to the product in the first few seconds and show one outcome.
- Sales follow-up. A buyer comparing options who asked something specific on a call. Answer that question in the product, even if it takes a few minutes.
- Onboarding or help center. A new user in the middle of a task. One task per video, placed where the task happens. Our training video guide covers lessons like this in more depth.
- Launch or changelog. Existing users who want to see what changed. Show the new part first and skip the setup they already know.
- App store. Platform rules decide the length: Apple’s app previews run 15 to 30 seconds (Apple’s specifications).
Then write a one-line brief and keep it in view while you work: “This video shows [who] how to [do what], so they [take this next step].” For the running example: This video shows team leads how to turn a week of tasks into a status report, so they create their first report in the trial.
Length follows from the brief rather than a rule. Stop when the task is done and the next step has been said. If the script keeps growing because you want to show other features too, those are other demos.
Write a script the screen can prove
Pair every line with a visible action
A demo script has two halves: what you say, and what the screen shows while you say it. Writing them side by side keeps you from promising anything the recording can’t show, and gives you a shot list for the recording session.
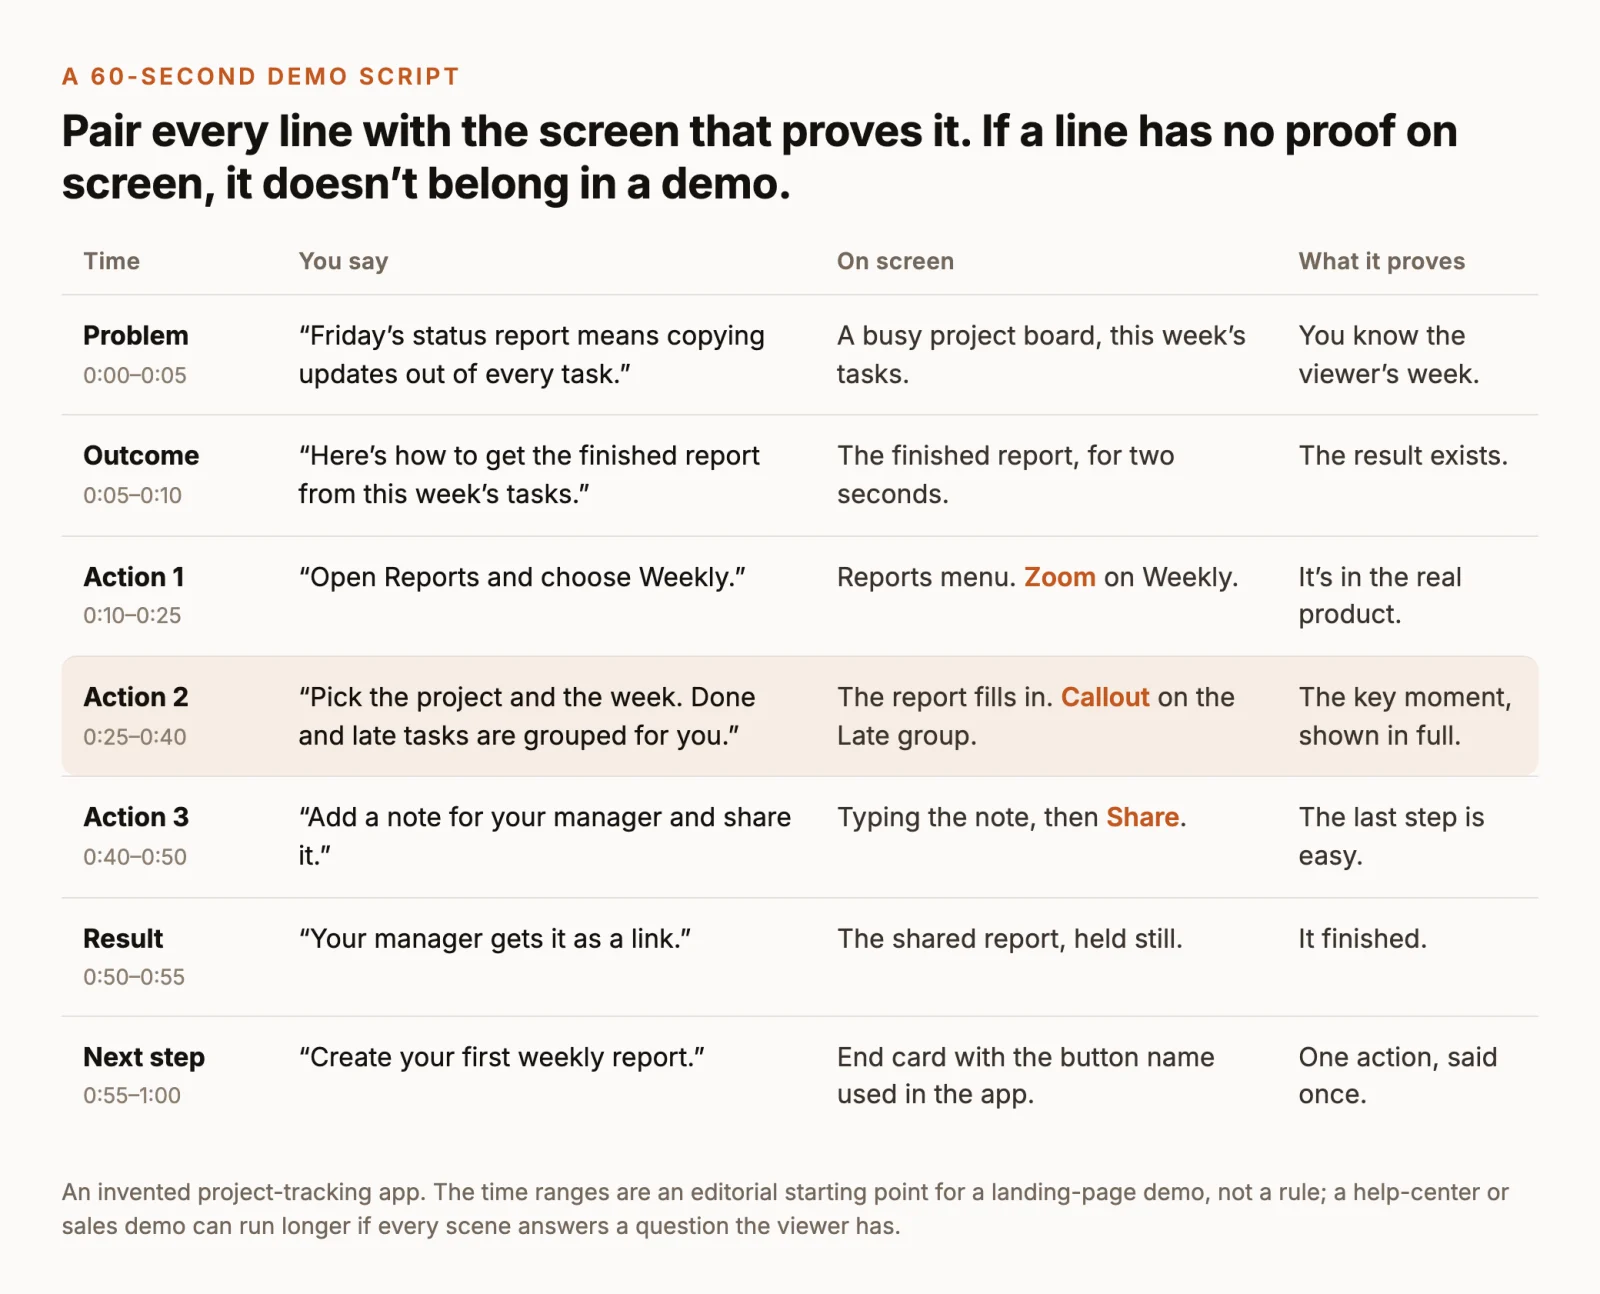
That shape works for most demos:
- The problem, in the viewer’s words. One sentence about their week, not your feature list.
- The outcome, shown early. A two-second look at the finished result tells viewers why the next 40 seconds are worth watching.
- Two or three actions. Each one a click and the change it causes. Name the controls viewers will need to find, and describe the result rather than every click.
- The result, held still. Long enough to read.
- One next step. Said once and shown on screen.
Read it aloud and cut what the footage can’t prove
Read the script aloud with a timer, then check each line against the third column:
- Every claim needs a picture. “Saves your team hours” can’t be shown in a recording; “done and late tasks are grouped for you” can. If a claim needs evidence the footage doesn’t contain, put it on the page around the video, with the evidence.
- Don’t narrate past the footage. If the recording stops before the report is shared, record the rest or end the narration where the footage ends. Saying something happened when the screen doesn’t show it is the fastest way to lose a careful viewer.
- Leave out details that date quickly. Prices, counts and the word “new” age the video. Put them in on-screen text you can replace, or in the page copy.
Prepare and record the real product
Set up a demo account with believable data
Record the real product, not a mock-up. Viewers are deciding whether the product works, and a simulated interface undermines the one thing a demo is for. Prepare the account so the task runs cleanly on camera:
- Use believable, invented data. Realistic names, amounts and dates look far better than “test test”. Use example.com addresses, which are reserved for documentation (IANA), and never show real customer data.
- Load the state before you record. In the example, the week’s tasks are already completed so the report has something to show. Nobody wants to watch you create twenty tasks.
- Be honest about waits. If an import or a render really takes minutes, cut the wait, but don’t present it as instant. A short “a few minutes later” card keeps the demo truthful.
- Clean the screen. Turn on Do Not Disturb, use a separate browser profile without personal bookmarks or extensions, and sign in before you start so no password or token appears on screen.
- Fix the frame. Size the window to the shape you’ll export, usually 16:9, keep it the same for every take, and enlarge the interface with browser zoom so labels stay readable in a small player.
Record a short test, then clean takes
Record fifteen seconds first and watch it at the size people will see it, such as a laptop window or a phone. Check that labels are readable, the cursor is easy to follow and the microphone sounds close and clean. Then record the real takes:
- One action per take. Short takes are easier to redo and easier to cut together.
- Pause after each click. Let the result appear and settle before you move on.
- Move the cursor calmly. Straight lines, a short rest on the target, no circling while you talk.
- Hold the result. Two or three seconds on the finished report, without touching anything.
In ChatCut, open the chevron on Record, choose Screen under Recording settings, pick a microphone, then select Record and choose the window in the system picker. Select Stop recording when the take is done. The recording lands in My Assets and on the timeline at the playhead, and recording uses no credits (recording docs). Footage from another recorder goes in through My Assets → Upload → Files….
If narrating and clicking at the same time keeps tripping you up, record the screen silently, then record a Voiceover take while you watch it back. You can also generate the narration from your script with AI voiceover, which uses credits; listen for how it pronounces your product’s name.
Edit the pacing, zooms and callouts
Remove idle time without losing cause and effect
Cut the waiting, the hesitation, the repeated clicks and the wrong turns. Keep the click, the change it causes and a moment to see that change. A demo that jumps from a click straight to a different screen looks staged, even when it isn’t.
Narrated takes are quickest to tighten in Transcript: deleting words removes the matching video. For silent waits, split the clip on either side of the wait and delete it, or use Speed on stretches where nobody is talking. For a first pass on a long take, type @ in the chat box and pick your clip in place of @recording:
The built-in agent uses ChatCut credits when it edits, and the callouts and end card it creates are Motion Graphics, which can add generation credits. Check any confirmation before it runs, then play the result through and compare it with your script.
Zoom to the detail, then restore context
Zoom when a control or a value is too small to read at the size people will watch, and on the one moment the viewer must notice. Zooming on every click makes a demo feel restless and hides where things are. Hold each zoom long enough to read, then pull back so the viewer sees the whole screen again. In ChatCut, drag a Zoom from Library → Zoom onto the clip and set its magnification.
Callouts work the same way: one per key step at most, short enough to read in a second or two. The motion graphics guide covers how to describe a callout’s text, timing and placement so it comes out right the first time.
Keep captions and callouts off the important controls
A demo that autoplays on a landing page starts silent: browsers allow muted autoplay but restrict autoplay with sound (Chrome’s autoplay policy), so captions carry the narration until someone turns the sound on. Feeds that start videos muted work the same way. In ChatCut, turn on Captions below the Viewer, pick a style, and correct product names in the caption track’s Content panel.
Then check the key moments frame by frame. A caption block or a callout sitting on top of the button you’re demonstrating, or on the result you’re proving, defeats the purpose. Move it, shorten it or drop it. If something private slipped into a take, cover it with the Local Mosaic effect from Library, which pixelates a rectangle you can position, or re-record the step.
Framing is optional. A padded background with rounded corners helps a demo stand out on a landing page or in a feed; a plain full frame usually suits a help center better.
End on one next step, then export and check
Match the next step to where the video lives
Show the finished result first, then ask for one action, said once and shown on screen with the button name the viewer will see in the product:
- Landing page: start a trial or create the first report.
- Sales follow-up: book the next call or reply with questions.
- Help center: the next task in the series.
- Launch post: try the new feature.
Several links at the end compete with each other, so pick the one that fits the placement in your brief.
Export and watch the file at real size
Open Export → Video and choose H.264/MP4. ChatCut Desktop renders on your computer at up to 4K; cloud exports from the web editor go up to 1080p. For a vertical version, set the aspect ratio below the Viewer to 9:16 and reframe so the action fills the column instead of sitting in a strip with bars above and below.
Then open the exported file in an ordinary player, at the size it will appear, and check:
- Readability. Labels and values legible in a small embedded player and on a phone.
- Captions and callouts. Clear of the controls and the result, with product names spelled right.
- The result. Visible and held long enough to read.
- Audio. Even levels, no clipped words, music (if any) well under the voice.
- The ending. The next step on screen, then stop.
Keep the master file and the editable project. Give the demo an owner, and update it whenever the product changes under it: a renamed button or a moved menu makes a demo look out of date and confuses the people it’s meant to convince. Usually you only need to re-record the step that changed.
Make a short promo from the same product
A demo proves the product works; a promo makes people want to look. Many launches need both: the demo for the product page and sales follow-ups, and a promo of a few seconds for launch posts and feeds. Speeding up the demo and adding music doesn’t turn it into a promo. Make the promo as its own short video from the same product.
In ChatCut, the App Promo Skills start from your product website. The Simple style, for example, pulls your logo, colors and copy from the site and rebuilds its calm, type-led motion and pacing for your brand, on an editable timeline. Generating it uses credits. Our comparison of promo video makers covers other tools if you’d rather start from a template elsewhere.